Our newest app, Crazy Lens, is live on the android market! This post is a quick guide on how to use it.
Changing the applied transform:
Simply swipe to the left or to the right to switch to a different transform. The application will automatically cycle back to the first transform when you swipe past the last one.
Changing the image:
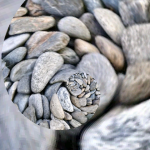
The first time you run the application, it will load a sample image of some rocks so you can get started right away. When you are ready to use your own image, click on the menu button of your device, and select the “Change Picture” menu item. This will launch your device’s Gallery application to allow you to choose an image to use. Most device’s gallery applications also provide a way to capture a new image using your device’s integrated camera. Simply choose (or create) the image you want to transform, and Crazy Lens will load it up, and remember your choice next time it launches.
Changing transform effects:
Three of the included effects allow you to alter some of their settings. To access the settings screen, click on the menu button of your device, and select the “Settings” menu item.
Pixellate – Use the slider to select a number from 1 to 15 – the smaller the number the less pixellation – in fact a value of 1 results in an image that matches your original. The larger the number the greater the pixellation – by default Crazy Lens uses a value of 10.
Mirror – Choose either Horizontal or Vertical for mirroring. An imaginary line is drawn across the center either horizontally or vertically, and the mirroring is applied. In the horizontal case, the area below the imaginary line will be transformed to mirror the portion above the line. In the vertical case, the area to the right of the line will be transformed to mirror the portion to the left. By default Crazy Lens uses Vertical mirroring.
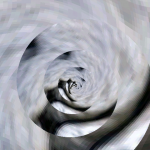
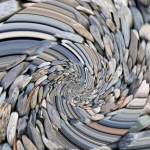
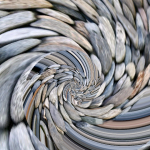
Vortex – There are 2 settings available to use for this effect, one is called inner radius and the other is called outer radius. Allowable values range from 1 to 200, and these are just the type that you have to play with to really see the result. By default Crazy Lens uses an inner radius of 20 and an outer radius of 140 – this achieves a nice swirling vortex effect while still being able to tell what the original image may have looked like. A future post will have some other settings and what they may look like.
Saving the result:
You can save an image that has the effect applied to it by clicking the menu button on your device, and selecting the “Save” menu item. Your original image will remain unchanged, the new image will be saved to your SD Card in a “Crazy Lens” directory using a file name that is similar to your original file name, but with the name of the transformation also added. The Gallery application on your device is notified of the new image, so you can view it right away in there as well.